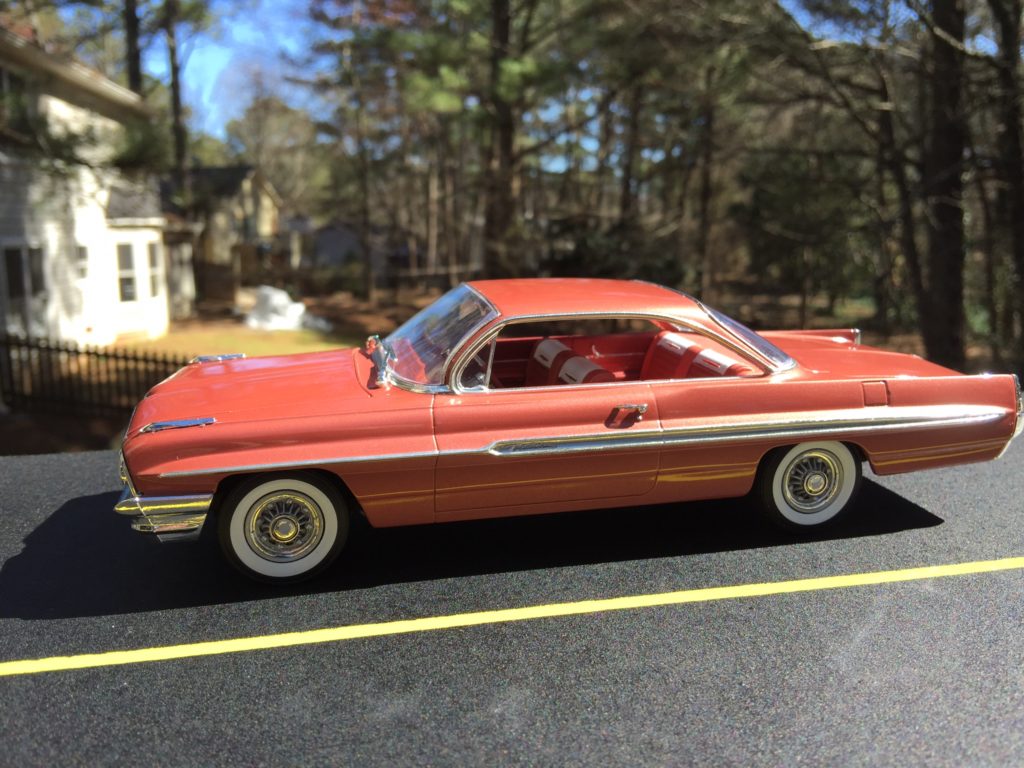
Bob McAllan built and reviews Revell’s new 1969 Boss 302 below:
The Mustang for 1969 was the first major restyle of this iconic Pony Car class from Ford. The Boss 302 was a special model that emphasized the importance of winning on the racetrack with a regular production car. The phrase “Race It On The Weekend-Drive It On Monday” was a major advertising lead-in for Ford’s print and television marketing at that time. Since the rules for racing in various classes varied so much Ford offered accessories to buyers all the parts that race teams of the day needed to be competitive on many levels. The styling of the Boss 302 was done by Larry Shinoda and gave the car its distinctive appearance. The car offered a special version of Ford’s thin-wall small block V-8. To add to its appeal to young buyers and racing enthusiasts Ford added front and rear spoilers and special paint and decal markings. This kit represents the 69 Boss 302 very well as the most popular vintage Mustang currently on the collector market.
Start with the 21-piece V-8 engine
assembly; it makes into an accurate example of this iconic engine. The 302
engine became the basis for many of Ford’s engine platforms over the past 50
years. It assembles into a stock version
of this engine with a single 4-barrel carburetor, separate distributor and
coil, a detailed front cover with water pump detail, a separate oil filter
unit, upper radiator hose, starter and generator, fan and drive unit. It has
well detailed exhaust manifolds, chrome valve covers w/ breather cap and air
cleaner with accent decal. While the engine appears complete when finished and
painted it lacks a fuel pump, a bracket for the alternator and a lower
radiator-to-engine water hose.
The kit contained Tampo printed
Firestone Wide Oval tires and stock wheels to build a very realistic factory
stock appearing model. I substituted Cragar 5 spoke deep offset chrome mag
wheels from my parts box to add a more aggressive look.
The kit has a generic 6-piece
interior tub carried over from Revell’s previous variations of the 69-70 era
Mustang cars. The tub did not have separate door panels and back seat. The
center console was molded into the floor between two 2-piece generic bucket
seats. The interior had minimal molded in detail on the door panels but did
include excellent wood grain decals to accent the dashboard gauge surrounds and
gauges and shift lever area on the console. The decals are thin and needed a
lot of fiddling to make them lay down around the gauge surround areas. There is
a chrome gearshift lever that needed some rubber paint to reflect a real
appearance and has a ting accent decal for the knob.
Next is the 7-piece chassis with a
molded in front suspension assembly, a 1-piece driveshaft, axle and spring
unit, a 2-piece exhaust pipe-muffler system and four detailed shock absorbers.
I painted the chassis Krylon matte black and the front and rear suspension
units Krylon semigloss black. The exhaust system and the masked off gas tank
were painted dull aluminum to look better than the call out colors recommended
by the instructions. I modified the ride height of the front spindles by
snapping off the mounting pins on the front end and reset them about 4 scale
inches to give the car a more aggressive stance.
The clear window glass was a 1-piece
unit that went in well. The 4 clear headlight lenses were mounted into chrome
buckets that fit into fender the headlight areas and the other two were mounted
into the rear of the grill assembly. The 2 read clear taillights mounted into
the rear body fascia panel. The only problem with the grill was it was supposed
to be a chromed unit. But when Revell redesigned the front fascia unit to
correct prior design errors on earlier model editions they had it cast as a
white plastic part. The chrome accent edges are very thin and it takes a steady
hand to pick out the chrome surround with whatever trimming material you
prefer. I tried both chrome foil and Molotow chrome pens unsuccessfully and
ended up using chrome paint and a very fine detail brush as a last result.
The kit was molded in white
polystyrene. The 6-piece body consisted of front and rear fascia units, the
main body, hood and two door mounted rear-view mirrors with chrome mirror
inserts. The only mold lines were at the ends of the front fender areas. The
most serious issue was that there was a large molded indentation area on both
sides of the roof just behind the door small side glass area. These
indentations were not on any of the earlier Revell versions of this 69 Mustang
car. I had a devil of a time securing body putty into these areas until I
drilled a hole into each of the indentations to act as an anchor. Then sanding
it to form the correct curve of the roof sides. The body and hood had some
fitment issues after the radiator top was installed during assembly and
required some sanding and fitting to allow the hood to fit even with the grill
and front fender lines on each side.
I painted the body, hood, front and
rear facias and side mirrors with Tamiya TS-11 Maroon lacquer. I obtained one
of the best rattle can paint jobs ever with no need for a clear coat and
minimal polishing. My difficulties began with the paint call out for the
requiring a masking of the hood and cowl area to apply the satin black
hood paint. I used Krylon Satin Black and it looked great, but after repeated
attempts to align the decal to define the satin painted area failed I said to
heck with it since the edge of masked area did not have the same sheen and the
decal was so thin I opted for no other distinctive body graphics decals for the
side and trunk lid either. I used the front Satin black spoiler and the rear
window louvers but omitted the rear deck spoiler.
All the assembly units fit together
well except for the trouble with attaching the side mirrors and the front
spoiler. If I were to attempt building this or any other model with this type
of attachment points, I would drill a small pilot hole into the body and then
place a thin wire or round mounting pins to these parts to keep them from
constantly falling off. This was the reason I left the 3-piece rear spoiler
off.
The chrome pieces were excellent,
but someone needs to have Revell include the reworked grill into the chrome
tree.
Overall, I enjoyed the model build
and with a little more pre-assembly drilling holes for parts attachment and
fabricating mounting pins it will likely be easier to replicate a more accurate
replica of this highly collectable muscle car.